LACES NexGen users must be approved by their agency director or administrator before a username will be created for you to sign in to LACES NexGen.
Once your username has been created, you will receive an email with a link that allows you to:
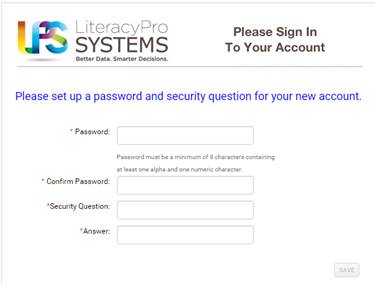
•Create a password
•Enter a security question and answer
The link is available for 7 days and may only be accessed once.
Passwords must contain a minimum of 8 characters, and must include at least one alpha character and at least one numeric character. Passwords cannot be the same as your username.
Screen to set up password and security question for a new account:
If you forget your account name or password, the security question and answer is used to retrieve this information. Keep your security question and answer in a secure place.
Each account must be associated with a unique username and email address! You are not allowed to have multiple user accounts with the same username or email address.
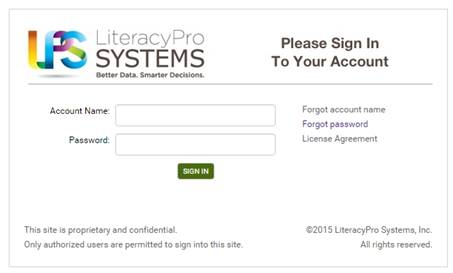
There is a single, secure URL for signing in to LACES NexGen, even for users with access to multiple agencies.
LACES NexGen URL: https://laces.literacypro.com/laces
The URL can be bookmarked for quick access. Each browser has a bookmark or Favorites feature. Follow the instructions for your browser to bookmark the URL for LACES NexGen. If you are not sure how to bookmark a URL with your browser, use your browser’s help feature to find this information.
 Typically, only state ABE
directors, state regional personnel, or state administrators have access to
multiple agencies within a client.
Typically, only state ABE
directors, state regional personnel, or state administrators have access to
multiple agencies within a client.
When you sign in for the first time with your user account and password, you will be presented with the user license agreement. You must agree in order to continue. After agreeing, you will be taken to the appropriate agency within your client.
You only have to agree one time, but you may open or print the license agreement at any time by clicking the link ‘License Agreement’ on the sign in page.
Sign in with your account name and password:
After signing in, you will be taken directly to the default area in the application.
If you have access to more than one agency within your client, you must first select a specific agency to sign into.
Multiple agency access:
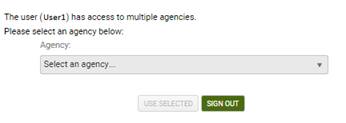
After signing in, you can easily switch between agencies by selecting a different agency from the dropdown list at the top right of the screen.
I forgot my password. What do I do?
If you clicked ‘Sign in’ but entered your password incorrectly, you will get the message:

To set a new password:
1. Click the link ‘Forgot password.’
2. Enter your account name.
3. Click Submit.
4. Enter the answer to your security question answer.
5. Click Submit.
6. reCaptcha displays.
7. Enter the displayed code.
8. Click ‘Send Notification.’
9. CHECK YOUR EMAIL!
The activation link to set a new password is only valid for 30 minutes after ‘Send Notification’ is clicked – not 30 minutes from the time you receive and open the email. Click the link in your email message and follow the instructions to set a new password.
I forgot my account name. What do I do?
If you clicked ‘Sign in’ but entered your account name incorrectly, you will get the message:
1. Click the link ‘Forgot account name.’
2. Enter your email address.
3. Click Submit.
4. reCaptcha displays.
5. Enter the displayed code.
6. Click ‘Send Notification.’
7. CHECK YOUR EMAIL!
You will receive an email with your account name.
If you did not activate your account initially by setting a password and security question and answer, you will get a message to contact your system administrator when you click the links for ‘forgot password’ or ‘forgot account name.’ Contact your agency director for authorization to have the setup link resent to you.
I’m signed in. Now what?
After signing in, you are able to access and add/edit/delete records at various areas, depending on your sign in account roles and permissions. The areas available to you display across the top of the window. Clicking on an area link will display:
•Client and agency (Users with access to only one agency will not see ‘Client.’)
•Account icon
•Dropdown list for view options
•Toolbar
•Search criteria builder
•Pre-defined and template searches
•Documentation
•Grid for that particular area
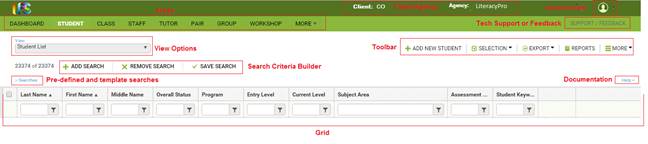
The most commonly used areas are displayed first. Additional areas are available by hovering your mouse over ‘More’ and then clicking the area you wish to access. The area name will display while you are working within that area. For example, after clicking ‘All Assessments’ from the ‘More’ area, ‘All Assessments’ will display until you go to a different area.

The Student area is the default, but you may change the default area by clicking Profile at the Account Icon.
Why is there a green tile at the top of some of the area grids?
‘Tiles’ indicate the default filter(s), or search criteria, at a particular area. When you first sign in, most areas have a default filter already in place. The default filter may be removed while you are signed in, but the filter will be reapplied when you sign out and then sign back in.
Areas not listed below do not have a default filter and display all records by default when you go to that area.
|
Area |
Default Filter (displayed as a tile) |
Filter Definition |
|
|
|
|
|
Current Fiscal Year |
1. Prospective students whose intake date is in the current fiscal year. 2. Students whose status is not prospective, and have at least one instructional hour in the current fiscal year.
| |
|
Active |
Classes with the status of Active.
| |
|
Current Fiscal Year |
1. Staff with the overall status of active. 2. Staff whose status is not active, but have a class assignment with the start and end dates in the current fiscal year; have at least one hour in the fiscal year; have a line of staff history with an active status that has either a start or end date within the current FY.
| |
|
Current Fiscal Year
|
Tutors with the overall status of prospective, active, waiting, on hold, registered, or graduated and have more than 0 instructional hours in a pair or group during the fiscal year. (More than 0 includes fractional hours greater than 0, such as .25 hours.)
| |
|
Active |
Pairs with the status of Active.
| |
|
Active |
Groups with the status of Active.
| |
|
Active |
Workshops with the status of Active.
| |
|
Active
|
Donors with the status of Active. | |
|
Current Fiscal Year |
Current Fiscal Year assessments (includes pushed forward assessments).
| |
|
Active |
Students with an active or enrolled status in any enrollment.
| |
|
Active |
Persons who are not students (staff, tutors, contacts, volunteers) with an enrolled status in a workshop.
| |
|
Current Fiscal Year |
Student goals with the set date in the current fiscal year.
| |
|
Current Fiscal Year |
Students with a fiscal year summary record in a past or current fiscal year.
|