 Click to open
the record for viewing or editing the record details. You may also double-click
anywhere on the record row to open.
When you click on an area from the menu, you will see a list of records pertaining to that area on a grid containing rows and columns.
Rows are the horizontal portion of the grid containing the row data that comprises one record. On the right side of the row is a view/edit icon that allows you to open the record.
 Click to open
the record for viewing or editing the record details. You may also double-click
anywhere on the record row to open.
Columns are the vertical portion of the grid containing the column heading and column data.
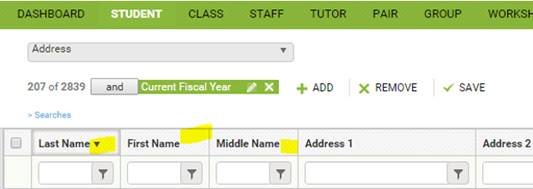
When a view is applied that contains a sort order on specific columns, those columns will display with an arrow indicating the sort.
 A – Z,
or 1 – 999 (ascending)
 Z – A, or 999 – 1
(descending)
For example, the student shared view ‘Address’ is sorted ascending by Last Name, First Name and Middle Name. When the view is applied, you will see the ascending arrows on the column headings on the grid:

To change the sort order on ‘Last Name’ to descending, click the column heading. This will change the arrow position on ‘Last Name’, and remove the arrow on ‘First Name’ and ‘Middle Name.’

Why were the arrows on First Name and Middle Name removed?
By clicking the column heading on ‘Last Name,’ you instructed the system to remove the default sort order, and use the one you just applied – sort descending by last name.
To restore the original sort order by ‘Last Name’ and ‘First Name’ and ‘Middle Name,’ you must reapply the view.
You may click any column heading to sort the grid by that column in alphabetical or numeric order. A single click will sort the grid in ascending order by that column (unless the column is already sorting in ascending order. In that case, clicking the column heading will sort in descending order). Click the column heading again to sort in descending order.
How do I change the width of a column?
The width of a column can be changed by holding the mouse pointer between two columns until the pointer switches to the icon with two vertical lines together with horizontal arrows. Click and hold the left mouse button to drag and resize a column.
What page am I on?
At the bottom left of the screen you will see the page that is currently displayed. The number of pages will vary, according to the number of records in the area. You can move from one page to another by clicking the arrows to move to the next page, or go to the last page, or by clicking a particular page number.
 The default setting for the
number of records to display is 200. You may change the number of rows to
display, and set your default page by going to Profile on the dropdown list under the Account
icon.
Why can’t all fields in a record be added to a view, like Language in the student and tutor record?
Fields that display multiple rows of data in the record details cannot be added to the grid. For example, multiple language records may be entered in the student detail record. These individual language records cannot be added to the grid view at the student. Only single entry fields, such as student keyword, program, and mobile phone, may be added to a view.