 Columns in views that you created and then applied
can be reordered by dragging and dropping the column. This will change the
field order in the view. When you open the View Manager and select that
view, you will see the new field order.
Columns in views that you created and then applied
can be reordered by dragging and dropping the column. This will change the
field order in the view. When you open the View Manager and select that
view, you will see the new field order.
The View Manager allows you to create, copy, delete, or modify an existing user-created view, at each area. First, go to the area where you want to change views. To open the View Manager, click the down arrow on the View Options dropdown list and select ‘Open View Manager.’
The View Manager displays:
Select View:
•List of available views for that area.
•The view currently in effect will be highlighted.
•To search for a particular view name, enter the name in the search field. The search is set to ‘starts with.’ This means that if you enter ‘h’ in the search field, all views that begin with ‘h’ will display. Additional or fewer views may display as you continue to enter text.
•To clear a search, delete the text in the search field.
Available Fields:
•A list of fields available to be added to a user-created view.
•Fields already added to the view in effect will not display in the list.
•To search for a particular field, enter the field name in the search field. The search is set to ‘starts with.’ This means that if you enter ‘f’ in the search field, all fields that begin with ‘f’ will display. Additional or fewer fields may display as you continue to enter text.
•To clear a search, delete the text in the search field.
Add, Remove, Remove All Buttons:
•Allows you to add or remove fields in a user-created view.
•Once a field has been added to a view, it will no longer display on the list ‘Available Fields.’
•Multiple fields may be selected and added or removed by holding the shift button to select a range of contiguous fields, or by using the control button to select non-contiguous fields.
Selected Fields:
•Displays the current fields in the view and displays the order of the fields.
•The order of the fields can be changed by selecting the field name and using the Move Up or Move Down buttons.
•Multiple fields may be selected by using the shift or control button, and then moved up or down by using the Move Up or Move Down buttons.
Columns in views that you created and then applied
can be reordered by dragging and dropping the column. This will change the
field order in the view. When you open the View Manager and select that
view, you will see the new field order.
Sort Fields:
•Allows you to specify how you want specific fields in the view to sort.
•A copied shared view will automatically display the fields being sorted.
•A new view will not be sorted. Click the field you wish to sort by and then click ‘Sort By.’
•‘Asc’ checked indicates the fields are being sorted in ascending order (A-Z).
•‘Asc’ unchecked indicates the fields are being sorted in descending order (Z-A).
•Clicking the up or down arrow next to the sort fields will change the order.
•To remove the sort on a particular field, click the X on the sort list.
For example, in the screenshot below, ‘Last Name’ displays before ‘First Name,’ and both have ‘Asc.’ checked. This means that the view will sort by last name first, then first name, in alphabetical order. ‘Adams, Bill’ would display before ‘Adams, Bob.’
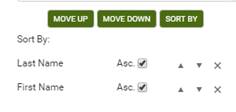
To sort by ‘First Name,’ click the up arrow on the ‘First Name’ row to move the field up.
Create a New View
1. Click the drop down view field.
2. Click Open View Manager at the bottom of the dropdown list.
3. Click New and enter a name for the view.
4. Click Save.
5. The name of the view you just created will display highlighted in the view list under ‘My Views.’
6. Select the fields you wish to add to the view.
7. Select the field or fields you wish to sort by, then click the ‘Sort By’ button.
8. Click Save.
9. The new view will be automatically applied.
10. When you display the dropdown list of views, the view you just created will display under ‘My Views.’
At least one field must be added to the view before the view can be saved and applied.
Copy a View
1. Click the drop down view field.
2. Click ‘Open View Manager’ at the bottom of the dropdown list.
3. Select the view name you wish to copy.
4. Click Copy and enter a name for the view. If you don’t enter a name for the view, the default name will be the name of the view and ‘_copy.’
5. Click Save.
6. The name of the view you just copied will display highlighted in the view list under ‘My Views.’
7. Modify the view by adding or removing fields.
8. Apply a sort order to the view by selecting the fields to sort, then clicking ‘Sort By.’ You may also delete the sort on a field by clicking X.
9. Click Save.
10. The new view will be automatically applied.
11. When you display the dropdown list of views, the view you just copied and modified will display under ‘My Views.’
Delete a View
1. Click the drop down view field list.
2. Click ‘Open View Manager’ at the bottom of the dropdown list.
3. Select the view name you wish to delete.
4. Click Delete.
5. Click Yes.
6. The View Manager will remain open.
7. When you are finished deleting views, close the View Manager by clicking Cancel, or the X at the top right corner.
Rename a View
1. Click the drop down view field.
2. Click ‘Open View Manager’ at the bottom of the dropdown list.
3. Select the view name you wish to rename.
4. Click Rename View.
5. Enter a new name for the view.
6. Click Save.
You may only rename, delete, or modify views that you created!
 New and copied views must have unique
name. You cannot have multiple views with the same name.
New and copied views must have unique
name. You cannot have multiple views with the same name.
Views are specific to your account and cannot be shared between users.
HOW TO:
“I want to create a view that includes the student’s assessment information, and the number of hours the student has earned. How do I create this view?”
There are already shared views that display assessment information – Student List – and student hours – Hours. Each of these views contains fields that you need, so instead of creating a brand new view, you may copy either of the shared views and add or remove columns to create the view you want.
For example, you may copy the Student List view and then and customize the copy.
1. At the student area, click the drop down view field and click ‘Open View Manager.’
2. Select the Student List view, then click Copy.
3. Enter a new name for your view, or use the default view name.
4. In the ‘Selected Fields’ panel, use the shift or control key and select the fields you don’t need, if applicable.
5. Click Remove.
6. At the ‘Available Fields’ panel, enter the first few characters of the field name you want to add. For example, enter ‘cur’ to display the fields that begin with these characters. One of the fields will be ‘Current FY Instructional Hours.’ Select the field and click Add.
7. Continue adding the fields you need.
8. Click Save.
9. At the View Options dropdown list, select the new view.
You can also create a new view and add the columns you need.