Reports are available at all areas except Family, All Assessments, All Student Enrollments, All Non-Student Workshop Enrollments, All Goals, All FY Data, All Follow-up Outcomes, and All System Tasks. Records at these areas may be exported to create a customized report.
There are two types of reports – reports that require parameters and reports that run without parameters. Parameter reports require additional information prior to generating, such as a date range or number of hours. ALL reports run on the current selection.
Reports can be run at any time and, depending on the number of fields in the report and the number of records in the current selection, will generate in a matter of seconds.
To run a report:
1. Select the Reports icon on the toolbar.
2. At the Report Manager, select the report you wish to run by checking the box on the report name row.
3. Additional report information will display on the right side of the window.
4. If parameters are required, enter the information.
5. Click Print PDF, or Print Excel.
6. Follow the instructions for your browser to download the report.
Only one report may be run at a time.
Report Manager
The report manager grid may be grouped by report title or category by dragging the column heading and dropping it in the designated row. Click X on the grouped button to remove grouping.
The report title and category columns may also be sorted by clicking on the column to sort A-Z or Z-A.
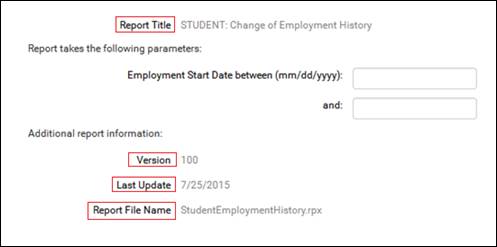
Each selected report has additional information. This information is important when submitting a tech support ticket if you are having problems with a report.
|
Report Title |
The title of the selected report.
|
|
Version |
The latest version of the report.
|
|
Last Update |
The date the last time the report was updated. Updates may include additional fields, or revised calculations on a field.
|
|
Report File Name |
The file name of the report.
|

After the report is printed, click the Cancel button on the Report Manager window to return to the area grid. Depending on how your browser is configured, clicking the X on the browser window may close the application and you will have to sign in again.
Address Label Reports
The label reports in LACES NexGen are designed for Avery 5160 labels and are best printed with PDF. If the labels are not printing correctly, you can change the print setting on your print dialog box. Change Size Options to ‘Actual Size.’

If you click the print icon on the downloaded .pdf report, you may not see the option for ‘actual size.’ In that case, save the report as a file on your computer, then open the file and select Print. The print dialog box for most printers will contain the options in the screenshot above. If you are still having alignment issues printing on address labels, contact your IT personnel to check your printer settings.
NRS Reports
The NRS (National Reporting System for Adult Education) has made several updates to the NRS reports and the data that is being reported. Previous versions of the reports must remain available in order to report on data from the fiscal years prior to the change. When running NRS reports at the student or staff area, be sure to pay attention to the title of the reports. For example, beginning in the program year 2012-2013, the NRS made changes to Tables 5, 5a, 6, 8, 9, and 10. The appropriate fiscal year for these reports is listed in the report title.
For example, to run Table 6 for fiscal years 2011-2012 and all prior fiscal years, you would run the first report shown in the screenshot. Select the second Table 6 for fiscal years 2012-2013 through the current fiscal year.

I entered parameters for my report, but the report didn’t run. Why?
Make sure you entered the parameter fields with the correct data type. For example, if you enter a date in a numeric parameter field, the report will not run.