When a record is added at a person area, enrollment area, or materials area, the records contain ‘details’ which are opened at the main area grids by either double-clicking the row, or clicking the edit icon.
Detail records contain tabs with panels, and tabs that do not contain panels.
|
Multi – function tabs
|
Contain multiple types of panels:
Data form panels displays a form with fields that can be entered or edited. The Student Data tab/ Key Info panel is an example of a data form panel.
Data grid panels allow you to enter records through a popup data form. The records then display on a grid. The columns on these types of grids can be sorted but cannot be grouped. The Student Data tab/ Comments panel is an example of a data grid panel.
|
|
Single – function tabs
|
Do not contain panels, and have more complex displays. Records display on a grid that can be grouped but not sorted by column. Multiple shared views are available at the tab, and search functionality for the tab is available. The student assessment tab is an example of a single function tab.
|
Data form panels
Data form panels display multiple fields that are always in ‘edit’ mode. When a field is entered or edited you cannot access other areas of the record until you continue by either saving or cancelling.
Data grid panels
Records can be entered at the data grid panels in the multi-function tabs in the detail records for persons and enrollments. At these types of panels, you will see + Add New Record. Click the link to open a popup data form that allows you to enter the information for the record.
As with all data forms, required fields must be entered before the record can be saved.
Save, Save and New, and Cancel buttons display on each popup window.
Open or delete a data grid record
To open a record at the data grid, click the Edit icon on the row. To delete a record on a data grid, click the delete icon on the row.
Entering a record at a single-function tab
Some single-function tabs allow you to enter data on a data form, such as student assessments. Others utilize a data chooser window, such as the class Enrollment tab.
How does a data chooser work?
Data choosers are windows that display lists of records that are ‘eligible’ for a particular task, such enrolling a student in a class, or assigning a staff to a class. Data chooser windows display maximized, but can be resized or dragged just like any other window. After resizing the window to make it smaller, you may click the maximize button at the top right. You may also click the X at the top right to close the window. Closing the window or clicking Cancel is the same thing.
Navigation buttons display at the bottom of the data chooser that allow you to go to the next page in the list. You may also set the number of items per page. The default number of records is 100 but can be changed on the data chooser to 150 or 200. The number of item to display is only changed while you are in the data chooser; the default of 100 will be restored the next time you use a data chooser.
You may select records across pages, then click the ‘Show Selected’ button to display the selected records in a second grid. Some data chooser grids contain fields that may be edited. Editable fields are displayed in green.
For example, at the Student Enrollments tab, you may enroll a student into a class, group, or workshop, or match a student with a tutor in a pair. When you select ‘Enroll into Class’ from the enroll field dropdown list, you will be presented with a list of active classes that the student may be enrolled into. Selecting ‘Match with Pair’ would display a list of tutors.
Using the data chooser at the student record to enroll a student into a class
1. Open the student detail record.
2. Click the Enrollments tab.
3. Select ‘Enroll into Class’ at the enroll dropdown list.
4. The data chooser window displays a list of active classes. Classes where the student is already enrolled will not display.
5. Select the class or classes you wish to enroll the student into.
6. Click ‘Show Selected’ if you wish to see the classes you have selected. This is optional.
7. Enter an enroll date in the field at the bottom left of the window. When this field is entered, the date will display as the enroll date on all classes selected.
8. If you have clicked Show Selected, the enroll date field is highlighted in green, indicating an editable field.
9. You may enter different enroll dates on the grid if you have selected multiple classes.
10. Click Enroll.
The process for using the enrollment or assignment data chooser at other locations is similar to the steps above.
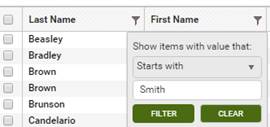
The list of records that display at the data choosers may be filtered by any of the columns that display. To filter the records:
1. On the data chooser, click the filter icon on the column you wish to filter.
2. A dropdown list will display.
3. Select the operator from the dropdown list. Operators are dependent on the type of field.
4. Enter the data to filter. For example, if you want to filter by last name, select the operator, then enter the last name in the field.

5. Click Filter.
6. The list will change, depending on the filter just added.
7. To clear the filter, click the filter icon again and click Clear.