Many of the dropdown list fields in your database can be
customized by modifying choice lists. This type of customization can be
done by anyone in your agency with a full access account and is not the same as
a customization done by a developer.
Dropdown list fields are different from text fields, where
any data may be entered. Not all dropdown list fields may be modified,
and some states have requested the removal of certain dropdown list fields so
they cannot be altered, but instead display a list of standardized items.
Items that display on the dropdown lists can be added,
hidden, or edited, and the order in which they display can be changed. It
is important to remember that modifying the items in your choice lists can
impact whether data populates correctly in the record, or populates correctly to
certain reports since some fields are directly data-mapped to application
business rules or reports.
Changes made to the dropdown list items will display for
everyone in the agency, not just the user who made the change, so it is
important to establish who will be allowed to make changes and what changes will
be made.
Updating Choice Lists
To get familiar with Choice Lists, first take a look at the
student record. You will see that there are several dropdown list fields
at the Student Data tab/Key Info panel. When you click the down arrow on
any of the fields, you will see the items available for selection. Before
you decide to modify any of the items, first understand what the field is used
for and whether or not you need to make changes or use the default items.
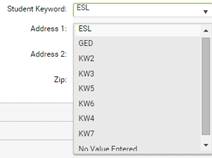
Student Keyword is a common dropdown list to modify.
Student Keyword is used to further identify students to either eliminate them
from reports, or to display a certain set of students by a keyword indicator.
For example:
Agency A serves both GED and ESL students. These
students can be identified by Program, or assessments. However, GED and
ESL can also be added as items on the Student Keyword dropdown list, which
allows you to quickly filter your list of students by keyword.
To update the Student Keyword choice list:
1.
Click Agency Settings from the person profile menu at the top right of
the screen. (Not all account roles will have access Agency
Settings.)
2.
Click the Choice Lists tab.
3.
Click the down arrow on the ‘Select a Choice List to View or Edit’ field.
4. You
can either scroll down in the list until you find ‘Keyword’ or you can enter ‘k’
directly in the field to land on the first choice list that begins with ‘k.’
5.
Select ‘Keyword.’ This is the choice list to change Student
Keyword.
6. You
will see the list of visible items that currently display in your list for the
Student Keyword field.
The columns on the grid may change depending on the choice
list you selected, but the common columns are:
|
Option Code |
Code that identifies the item. You cannot edit
the Option codes. Generally, option codes that are 3 numbers – 101,
102, etc. are LACES NexGen generated codes, and, depending on the item, it
is best to not modify the descriptions for these to a completely
different meaning if the option code is mapped to a particular report.
User created or migrated items will have an option code
with 5 or more numbers.
|
|
Display Order |
Determines the order of the items in the list. A
display order of 101 will display on the dropdown list before item
102. To change the order of the items, click the up arrow on the
row. This will move the item up one row and change the display
order.
|
|
Short Description |
Text that displays on the dropdown list. Must be
entered.
|
|
Long Description |
Additional text explaining the item that for agency
purposes only. Typically, the Short and Long Description are the
same. Must be entered.
|
|
Visible |
‘Yes’ means that the item will display on the dropdown
field list. Items cannot be deleted since they may be associated
with a record, but items that are no longer used may be changed to
Visible=no. These items will not display on the dropdown list, but
the original value will display in the field.
|
|

|
Edit, move up, move down
|
Student Keyword is not mapped to any reports, so you may edit
the descriptions on any of the items, regardless of the option code.
However, if a particular keyword has already been selected in a student record,
updating the choice list will also update the display in the student record.
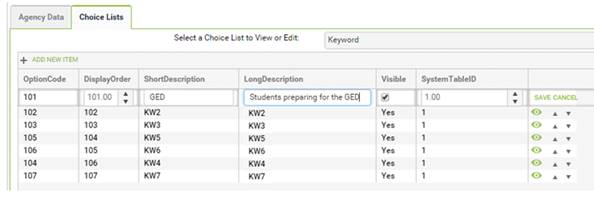
Using the screenshot below:
To modify the first keyword item ‘KW1’ to ‘GED’
1.
Click the edit icon on the first row for KW1.
2.
Delete the text ‘KW1’ in the Short Description field and enter ‘GED.’
3.
Delete the text ‘KW1’ in the Long Description field and enter ‘Students
preparing for the GED.’ (This can also be the same as the text in Short
Description.)
4.
Visible will be selected automatically. Leave the checkbox selected
so the item will display on the list.
5.
System Table ID will populate automatically. There is no need to
change this field.
6.
Click Save.
To add an item
1.
Click + Add New Item.
2. The
editable fields on the row will change to edit mode.
3.
Option Code and Display Order will automatically populate. There is
no need to change Display Order.
4.
Enter the Short and Long Description.
5.
Leave Visible selected.
6.
System Table ID will populate automatically. There is no need to
change this field.
7.
Click Save.
8. The
new item will be at the bottom of the list. If you want to move the item
up, click the up arrow on the row.
9.
Notice that the option codes do not change, but the display order will
update each time you move the item up.

All of the items on the Keyword choice list are visible when
you open the student record. Remember that the original item for option
code 102 will be replaced by ‘GED,’ so the Student Keyword field may change in
some student records if the original keyword ‘KW1’ was initially selected.
Notice that KW2-KW7 display on the list. However, since
these are placeholder text, there is no need for these to display. These
items can be made Visible=no, or invisible.
1. At
the Keyword choice list, click the edit icon on the rows you don’t want to
display on the dropdown list.
2.
Uncheck Visible.
3.
Click Save on the row.
4. The
item will disappear from the list.
To see all items on a particular choice list, whether visible
or not, select the checkbox at ‘Display Invisible Items.’
By making unnecessary items invisible, the dropdown list is
easier to manage and displays only the relevant items.

Hiding or Unhiding Multiple Items
Over time, certain choice list items may have multiple items
that are no longer necessary or used. For example, if your agency
has used LACES for several years, the ‘Term’ choice list may contain items that
are no longer relevant. Multiple items may be hidden on the choice list by
selecting the items, then clicking ‘Hide Selected.’
To hide multiple choice list items:
1.
Select the choice list.
2.
Check the box in front of the items you wish to hide.
3.
Click the ‘Hide Selected’ button.
4. The
items will be changed to Visible=No.
5. To
see all the hidden choices on a particular list, check ‘Display Invisible
Items.’
Multiple items may be made visible by:
1.
Check ‘Display Invisible Items’ to display all items
2.
Check the box in from of the items you wish to unhide.
3.
Click the ‘Show Selected’ button.
4. The
items will be changed to Visible=Yes.
 Not every item on the Manage Choice Lists screen
pertains to your agency, and not every drop down list can be changed. If it’s
not on the Choice Lists tab, it cannot be modified.
Not every item on the Manage Choice Lists screen
pertains to your agency, and not every drop down list can be changed. If it’s
not on the Choice Lists tab, it cannot be modified.